Please do not edit this page unless you have my permission or if there is any grammar errors. Thanks. |
| The Adventures of Nima | ||||
| ||||
| Developer(s) | WaddleInc. | |||
| Publisher(s) | Nintendo | |||
| Platform(s) | Nintendo GM | |||
| Genre(s) | Adventure, RPG | |||
| Series | Nima Quest | |||
| Age Rating(s) |
| |||

The Adventures of Nima is an RPG game for the Nintendo Game Master. It was first announced at Fantendo Carnival Showcase 2016. The game features Nima, a young Kirby who hopes to become an explorer. It is rated 12s/T for violence and fear.
Story[]
Nima was sleeping one night, when he heard clanging outside his house. He woke up and looked outside the window. Then he saw tiny little knights opening the gate of the town, and Bronto Burts carrying the townspeople. Nima rushed downstairs and attempted to open the door, but failed. He tried jumping out the windows, but they were locked somehow. Nima gave up trying, and went to bed.
The next day, surprisingly, Nima was not captured. After a while, Nima woke up. He picked up an old broken sword, and headed outside. Nima was one of the special Kirbys, who could find things easily. When he went outside, he knew where the key for the gate was, but it was very hard to get to with guards protecting it.
That's when the game starts.
Features[]
Naming: Like most of these Earthbound games, you get to name someone. Not the characters though. It's a bit like Undertale. You name a special kirby who becomes important late game.
Battle System: Ever played Earthbound? Well the battle system is simple. You are given 6 different options for the main party member. They contain Bash/Shoot, Items, Auto Fight, Special, Defend and Flee. Bash/Shoot is kind of obvious. You will attack the enemy. Items brings up a list of items in your inventory you can use to either heal or deal damage. Auto Fight chooses options by itself until you disable it by pressing (L) during an enemy attack. Special is for any special moves the player can do, e.g.(Redwaddle's psychic powers). Defend puts the player on guard. Flee makes you run away from the battle. The chances of running away from a normal enemy is 20%. The higher the amount of enemies, the harder it is to get away. Your health and magic points are shown in a special box at the bottom of the screen. When you get hurt, your health counter goes down. The enemy is shown just above the player boxes. They will have a unique background behind them which will sometimes represent themselves, or their personality.
Characters[]
These first few characters are people who join your party.
| Artwork |
Character Name |
About | Unlocked |
|---|---|---|---|

|
Nima | Nima is a normal kirby, who sets out for adventure when his friends are captured. He doesn't know whats ahead, but he is always prepared. | Default |

|
Redwaddle | Redwaddle is a Waddle Dee, who is red. He touched a mysterious rock and gained psychic powers. He can use these powers to save captured people! | Save him in Chapter 2 |

|
Nimbli | Nimbli is a nimbus person who came from the sky. He knows whats going on, so he decides to join Nima in his adventures to defeat Nightmare, and also save Nima's friends! | Save him in Chapter 5 |
Gameplay[]
The game is an RPG, meaning you have many stats. They are gold, XP and level. There is also attack, magic, defence, speed and luck. You can increase those stats by defeating monsters. When you're not in a battle, you use the joystick to move around and certain buttons to interact, but during battle you use the joystick to switch which party member is going to attack. You use the (A) button to confirm, and the (B) button to go back. There is four party members, each one has different moves. I will show you more about that later.
Stats[]
So you might of heard me talking about attack, magic, defence, speed and luck before. I will now talk about what they do. First of all, strength is what keeps your character good and strong, and increasing this is a good choice but defence is good as well. Defence is what keeps your character prepared and so they won't take as much damage from enemies. You should increase this stat a lot because the boss battles can get a bit tricky when the bosses do a super special attack. Magic is what makes your character intelligent, and so it gives them the opportunity to increase their magic skills. In other words, it increases their magic limit. Speed is important, because if you don't have enough speed, the enemy can attack before you! Make sure to increase this as well as attack and defence! Luck is a very good stat if you want to deal lots of damage. It increases your luck, which means a higher chance of getting a lucky hit. Each time when you choose to increase luck, your actual luck amount will increase by 1%. Each time you increase it the lower the percent is. First time is 1%, second time is 0.8%, third time is 0.6% and so on. It ends at 0.1%.
Walkthrough[]
Orange = Mini-Boss
Red = Boss
Purple = Secret Boss
Chapter 1 - The Beginning of the Journey[]
Nima wakes up in his house, and takes an old broken sword. He heads outside in search for the key for the gates. The gates is what keeps all the townspeople in, but since they were taken away, Nima must get the key and get them back. When trying to get the key, you will have to pass various puzzles. After completing each, you can get the key. But once you touch the key, two guards will dash into Nima and a fight will begin. This is the first fight in the game, and it isn't too hard. You must use Nima's tattered sword in order to defeat these guards. After defeating them, the key is yours.
Head over to the gates and open them up. Nima will then meet with a waddle dee wearing a red banded top hat. The waddle dee tells Nima to find the seven crystals across the world, and then meet with Nightmare to have a final showdown. He then says that he can sense a crystal on Sugar Summit, but only courageous people can go there. You must give the guard blocking Sugar Summit a Courage Medal, which is given to Nima by Master Doo. Master Doo is a boss fought near the west of the outskirts of the town. He has a lot of defence at the start of the battle which is caused by his electric barrier, and you must use an energy magnet to take it away. That item will become useful later on. When you defeat Master Doo, you will get the medal. Bring it to the guard blocking Sugar Summit.
When you enter the summit, you are encountered by a Sugar-Ice Cube, which is one of the very first enemies you fight in the game. After killing defeating it, you will be able to freely roam around the place, but the most important place to go to is the Ice Caves. In there, you will find a Mallet, a strong item. It can be used to pound down switches and smash ice blocks. You get the Mallet by defeating the Metal Star, which is a boss found in the darkness pit you fall into after talking to the lost waddle dee (who turns out to be working for Nightmare). After defeating the boss, smash the ice blocks at the wall with your mallet. Suddenly, the whole mountain will start to quake, and then Nima will fly upwards into the sky, landing in a village.
In this village, you can buy equipment such as a Copper Ring or a Lucky Horseshoe. This place isn't really important in the main game, and no enemies are encountered except for the Evil Snowman, who is a secret boss fought in a room in a vacant house. That room is found by bombing the crack in the wall.
Once you head out of the village and you are ready to continue the adventure, you are confronted by Chilly the snowman. He isn't too hard, but the mini-boss music still plays. You can defeat him by using five bombs in a row. After he is defeated he will run up the mountain and vanish. Once you think he is defeated, he actually isn't. You'll see what happened to him now.
To find the crystal, you must follow Chilly around. After chasing after him for a long time, he will spot a crystal crown and pick it up. He will then wear it and evolve into the keeper of the crystal, Ultra Chilly. He is very hard compared to normal Chilly, and using bombs will not work. Instead, you must break his crown which can be very hard. Your average mallet cannot reach it, so you must make Ultra Chilly fall over. You can do that by breaking his Sugar-Ice Cube barrier, and of course, that requires the mallet. After defeating him, you are given the first crystal. Head back down the mountain, and tell the top hat Waddle Dee. He will then move into Nima's hometown. The next crystal is in the Cave of Echoes.
Chapter 2 - Teaming Up[]
After heading down the summit, Nima must go to his house. Nima should then go upstairs and start to sleep. After about five seconds when the screen turns to black, a big crash noise is heard. Nima then wakes up and rushes outside. No one seems to be there, so you must try to find what happened. If you head east to the park, you will see that a comet has landed. If you check it, it will tell you where to go to find Redwaddle. You must go back to bed and sleep again.
Later in the morning, you must head south of the gates in the town. You will soon see another gate, that can be opened by defeating a boss. After checking the gates, it will say you can't open it. Suddenly, you are confronted by Beanbons. The beanbons will carry Nima to Whispy Woods. This battle is very hard if you don't have a Lucky Horseshoe, because Whispy has a lot of health. Whispy's attacks are mainly blowing you, and by doing that you will be pushed away from him. In other words, it will be harder to hit him. You can use bombs against this guy, and it should be a breeze. Once you defeat him, you will be awarded the Key to the Safari. Open up the gate you were at earlier and you will now be in the Safari.
Many enemies here are harder then the ones you met on Sugar Summit. There is now beanbon enemies, which deal a lot of damage. You can play around in the safari, but it is most important to keep heading south to find the Hidden Town. There is gates to this place too, and you must get the key by finding it under a rock. Unlike other rocks, the rock where the key is hidden is shiny, so once you see a glowing rock remember to Check it by pressing the (L) button. Once you go inside Hidden Town, you are met with a ghost. The ghost says "Wooo! Woo!!! Wooooo! Woooo!" which can only be translated with a Ghost Dictionary. That item can be found in a house. What it means translated is "Redwaddle is in danger! Danger! Danger! Danger!!!" Many other ghosts can be found, but they don't say helpful things. If you go into Redwaddle's house which is the red house, there is a note that will say that Redwaddle isn't here anymore. Suddenly, Robo-Bon barges into the house, smashing the wall. If you didn't know who that is, they are a robotic beanbon. To defeat Robo-Bon you need to smash it with your mallet. Later in the battle it will get angry and install super armour. This armour can't be broken with the mallet, and to continue the battle you must at least try to break the armour with your mallet. Then the top hat waddle dee will barge in and smack the robot with a Titanium Hammer. This will break the armour. The waddle dee will say that this is the last time he is helping you. You can now defeat Robo-Bon in any style you want now. When he is defeated, a ghost will appear and say that Redwaddle is at the chasm.
To get there, you must head west and then south. You are then confronted by Redwaddle, who is trapped inside a cage. You need a key to save him, and the key is given to you by talking to a ghost who is slightly more green than the others. Then you must unlock Redwaddle's


Redwaddle's artwork found in the game's guide.
cage. He will then join your party, because he knows that you are on a journey to save the captured people. Now that you have Redwaddle's psychic powers, you can lift up the rock blocking the stream in the safari. Head back to the safari and head to the rock. Redwaddle will then say "Oh, you need some help? Let me j- Urgh. This.. is.... HEAVY!!!" and then he will lift up the rock, unlocking the path to the Cave of Echoes.
Nothing really happens at the stream at the moment, so you can just head east and you will find the cave. Inside the cave, many dangers await. There are traps everywhere, and even lava. Watch out for the ghosts here, they can possess you. Status effects will be dealt with later. There is a lot of puzzles, but I think I might be typing for a long time if I explain them all, so I'll skip to when the next mini-boss fight begins. After completing a puzzle, Nima and Redwaddle see a door being blocked by a huge rock with ancient symbols on it. Redwaddle tries to pull it out, but it will not work. Then a ghost will appear and possess Redwaddle, and now you must fight him. This boss is called Possessed Redwaddle of course, and you must not hurt him, because you would be hurting your friend! Instead, you must use the Sacred Music box to rid the ghost possessing Redwaddle away. After using the music box about six times the ghost will fly out of Redwaddle. Now you must fight the ghost without your companion. Doing this will be very hard, because Redwaddle has a move that solidifies ghost enemies, so instead you must use a Flashlight on the ghost. That may sound easy, but it isn't really. The Flashlight only affects the enemy for one turn, meaning you must loop it over and over and over until the ghost dies. You are then given the Sacred Chant.
Redwaddle will now wake up and turn normal again. Use the Sacred Chant to melt the ancient block away, and instantly you are confronted by the boss, Paranormal King. He is an evil ghost just like all the rest in the cave. You must solidify him to attack him, but after using that enough times he will, of course, turn into rage mode. This means he is infinitely solidified, but has much much more defence. A good way to kill him is with a Lucky Horseshoe. By the way, that item increases luck. After he is defeated, your party is awarded the second crystal! Head back outside and you are in for a surprise...
Chapter 3 - Chaos in the Desert[]
When you exit the Cave of Echoes, you will find that you are being crowded by desert waddle dees! They say they have heard that Redwaddle went to help Nima out, and so they are asking them to save the desert. You are then asked if you want to save them or not. If you do say Yes then good for you! If you say No then you're evil, and you will be given a second chance. After agreeing to save the desert, you must head south-east and you will find Dusty Path, a dangerous place, but it will turn out good after you save the desert. There are a lot of mean enemies here, like Living Cacti and Hot Heads. The cactus enemy can be defeated by using fire attacks while the Hot Heads can be put out with water attacks. If you go north-west you should find a little fountain. If you use (L) to check it, you will be given a Key to the desert town. Now head back down south to go on the path again. Keep walking east until you see a big orange rock with a circle on it. Then you must head north, and you will find a tunnel.
Inside this tunnel there is simple enemies, like bats. There is a few puzzles here, so we'll skip that. After doing some puzzles you will find a room with a fountain. If you open up a door on the left of the fountain, you will fall into a pit just like in the Ice Caves. Then you will meet the "lost waddle dee". He turns out to be extremely wise and powerful, and can freeze you. He doesn't have a unique fight so, fighting him will be just like fighting normal enemies. When he is defeated the door to the desert town will open up.
When you follow the path up to the desert town, take out your key and open up the gates of the town. You will find a shop, inn and a hospital. In the shop you can buy a Steel Mallet for Nima and a Ray Gun for Redwaddle. There is also Pep Brew there, which heals 50 health normally, but 70 to Nima, so it is very important. There is a lot of defence items there, but we want to get to the part where the chaos really begins right? So buy all the important items and equip them and off you go! Next thing you must do is go into a house, the red one to be specific. Then you need to check the locked box. It shouldn't open so you must go outside. Suddenly, an army of Hot Heads appear at the town. To avoid them, you will need to climb upstairs in the red house and walk on the ropes, but you will eventually fall off the ropes and enter a battle with the Hot Heads. If you are a murderer daredevil and you want to run through all the Hot Heads without thinking twice, you can run into them. This battle will be hard if you didn't buy anything at the shop earlier. It will also be hard if you don't have Redwaddle's psychic aqua attack. The first thing to do is to use the water attack. The enemies will then lose their fire. This is when the Steel Mallet comes in use. You can smash them with it, which.. sounds violent. But don't worry, they will just learn their lesson and become passive. After you defeat EVERY SINGLE ONE OF THEM you will be brought by a commander Hot Head to the Leader. This boss is the Emperor of Hot Heads. But he isn't the one causing the chaos. He is being helped! This fight is hard because the Emperor usually burns you giving you a status effect. This is annoying because Redwaddle will have to use his MP on saving Nima or himself. Burning does 10 damage per turn so watch out. The best way to defeat this guy is by using a Bucket of Freezing Water. You can pour it on the boss and he will be no longer burning for five turns. You can use a mallet to attack him while that happens.
After the battle, you are given the Cracked Stone. Head back out of the town and this time, go south. You will soon find the ruins. Put the Cracked Stone inside the ruins door and it will open up. Many traps are waiting here, so watch out. There is new and very strong enemies here too just like every crystal dungeon. This place doesn't really have puzzles so I think I might just tell you what to do. So after going inside the door, you will be given a choice of going through three doors. One on the left, one on the right and one on the top. The top one and the one on the right are blocked off. You must get a key for them. When you go in the left, there will be some blocks to push. You must push them onto their switch. You can tell which block goes where because each block and switch has a letter on it. The A block goes to the A switch, the B block goes to the B switch and the C block goes to the C switch. After doing this a spotlight will appear in the middle of the room, and a key will be shown floating down from the sky. You can then grab it and head to the door on the right. Open it up, and you will see a long room. You need to watch out here, because there is moving spikes and also Ruin Guards. There is a switch at the very beginning of the room, and you must push the block at the very end over to it. Doing this is painful, but you will get the key once doing it. Go to the door on the top and you will see a very big shining statue. This is one of the main rooms in the dungeon. There is another set of doors, but most are optional and they lead to some item. The second door on the top in the statue room is the important door. Go through it and then the door behind you will lock. You will want to go in the corner of the room because a huge stone block will fall down. It turns out to be alive, and you must battle it.
It's name is Brickley, and he's tough. The most effective way to fight it is with a Mallet. Smash it a few times and it will reveal its core. The core of it is very hot, so you must cool it down. You cannot smash it however, so you must use Nima's sword. Oh I forgot to tell you to buy the blue sword... sorry. When you hit the core enough times, the battle will end, but Brickley's core will just flee. Nima and Redwaddle will gain 0 EXP and 0 G. You can get some of those by chasing the core around and somehow fighting it. After that optional battle you will gain 2000 EXP and 500 gold. Now you will have the Golden Bombs. This will let you bomb the crack in the wall. Now there is a new place to explore, but don't go there yet because the boss is just back at the statue room.
Head back to the statue room and you will see little Ruin Guards working on the shiny statue. If you go inside the statue and climb up you will be forced to fight with the guards. However the guards will somehow slip off the statue, and then your party will too. Now it is time to fight the Ruins Statue, the boss of the ruins. This fight is pretty hard due to the enemy being very large. They have incredibly high defence (40) and also very high power (30). Fighting this thing will be hard no matter what you do, but it will be slightly easier if you use Redwaddle's barrier move. Once you have used the barrier move, it's time for you to use Nima's special attack with the Mallet. Which is Flaming Smash. This attack sets the enemy on fire, and does a base damage of 60, which is pretty high at the moment, but will become weak near chapter 7. Now that the statue is on fire, it will start to melt revealing a smaller statue inside it. This statue has 10 less value of all stats that the bigger one had, except for health because y'know.... It's smaller. If you keep repeating the process I was talking about earlier this boss should become easier and easier. After melting the final small statue, a tiny ghost will appear a fly out towards the unexplored area. It will unlock all the doors for us, so now Nima and his friend can explore.
Follow the tiny ghost until he is cornered. Then another battle will begin. This will be just like normal ghost fights, so I suppose you've read chapter 2 to know how to do that. After solidifying him a few times he will then become the flaming tiny ghost. Freeze him and then solidify him, because you can never use too much magic points! The battle will end when the ghost's flames burn out, and when the ghost turns golden. This is when you must use any kind of item that produces music. Or you can use Redwaddle's sleep song. Then the ghost will vanish and the party will get the third crystal and level up! Now you can head outside the ruins and advance to the next area.
Chapter 4 - The Right Place and The Wrong Place[]
After you head outside the ruins, Redwaddle stops moving for a moment. The background will turn black, and Redwaddle will start thinking. He will say that there is some other dimension out somewhere, and that the crystal is there. Now that you've got the third crystal, a house in Nima's hometown will unlock, leading to a new place. Once you go there, you can open up the boxes, but all you will get is sandwiches. Go down into the basement, and you will see some portal frame. You've got to use the three crystals to open up this portal. Once you go in the portal, you will end up in The Wrong Place, because the portal malfunctioned. The only way to get out is by finding the fourth crystal to activate another portal. Now that you're in there, you can explore many places, but most are blocked off. You also start off in Nima's house, and everything is reset. Go and do all the stuff you did at the start. The two guards and all the other bosses are harder. Once you've got the key, head to the gate of the town and open it up.
You are in the outside of the town now. Sugar Summit is the next place to go to. All the enemies are new, and there is Dark Wraiths, so be careful of them because they can poison you. If you try going the same way you did in Chapter 1, you will finally come to a dead end. Now you have only one thing to do, that is going back down the summit. If you try to head back down, a Metallic Chilly will rush into you and push you off the mountain. You will land in a secret grotto, which for some reason has a shop. Buy equipment and you can head north in the grotto. You will soon find a big rock. Then you have to start moving west. You will soon find a maze. Go inside and try your luck.... Ok I won't do that. I suppose you want to know which way to go. So starting off at the entrance, you must go up, then left, then up, then right until you see a triangle on the wall, then up and thats literally the quickest path in the maze! Now go inside the big door. Now you are outside of the maze. That was quick! So now that you are outside, you seem to be in some corrupted town. Something isn't right here. Go into the purple and yellow house and talk to the waddle doo. He will say that the town is slowly fading away because of the corruption. Now you must find the Purification Medallion and bring it to the fountain of the town. The fountain also seems to be corrupted, and is spewing out... poisonous water. Now to get that medallion, you must go into the caves of the town. To get there go into the wrecked house, and push the table left to reveal a hole. Jump in and now you are at the cave.
This cave is kind of isolated, so you can take a break from enemies for now. There is a ton of doors though, so pick the right path. Walk to the right until you find a set of twelve doors. The fifth door leads to a special item, and the eighth leads to the path you are supposed to go. Any other doors either nothing, or a new enemy. After going in through the eighth door, you will see three statues. Two are still, but if you touch the middle statue, you will have to fight them all. Master Statue, the middle statue, is the statue you need to focus on. He can send people to sleep, and even make them non-stop cry! Use Nima's mallet to deal with the other statues, and use Redwaddle's focus move. Usually nothing happens when you do this, but in certain fights it can help you out. Now that you've used Redwaddle's focus move, Redwaddle has learned how to use a new power, Metal Dust. This will turn enemies into metal, so they can be melted. This may not work on most normal enemies though. Use Metal Dust, and then use Nima's fire mallet attack. The statue should be set on fire, and will start to melt. Once it's gone, you may proceed through the cave again. Keep going through the doors you find and eventually, you will find the exit.
Now you must keep going north and you will find the Purification Medallion! Go back or use the Warp Mirror to get back to the corrupted town. Put the medallion in the fountain and- oh have I mentioned that a boss comes along now, and steals the medallion? Yeah, how nice. You got to chase the boss around until they stop running for a bit. This is when you can fight them! Touch the boss, and you encounter Gigant Edge! He has strong armour, meaning that he has a lot of defence. 80 to be exact! You must use strong moves against him, and make sure the attacks do at least 100 damage! If you can deal 200 damage to him, his armour will become weak, so now you can attack him normally. But this doesn't just mean his defence is lowered, he will also get angry, and start doing 20 more damage! A good strategy is to keep Redwaddle alive, because he can use good attacks against Gigant Edge. Once you defeat him, he will drop the Purification Medallion. Put it in the fountain, and now the town should be purified! When you do that, a waddle doo will tell you that he has made a bridge up to the top of Sugar Summit. Go up that bridge, and you will find the fourth crystal. Grab it and go down back to the purified town. There is a house with a portal in it, so put in your four crystals like last time, and you will be sent back to The Right Place. Phew! Now that that's over, you will be inside the portal house at the beginning of the chapter. Go outside and it will be night time. This means that the gates are closed, so either sleep in the hotel or your house.
In the morning, you will hear a loud bang. Go outside to investigate. Now there seems to be some big hole in the ground! Jump inside and you will find the boss which steals your fourth crystal, Mega Titan. Fighting him won't be an easy thing to do. A good strategy is to whack him a few times with Nima's hammer. There is a 25% chance that the boss will become dizzy. If you get him dizzy, you can now use Redwaddle's boulder attack and if you have high luck on Redwaddle, he has a chance of doing 400 damage to the boss! Keep repeating this strategy and the Mega Titan should now fade into dust. You got your fourth crystal back now, but how will you get out?
Chapter 5 - Up to the Sky[]
Now that you are stuck in that hole in the ground, you must find a way out, but getting out seems impossible. Some weird shadow Kirbys will start to form around you, and they will capture you! When you wake up, you seem to be in some kind of valley. Walk down the valley and try to avoid the enemies like the Storm Clouds. They can make Nima and Redwaddle feel numb, and can do a lot of damage. When you get to the bottom of the valley, you will find a beanstalk. In this beanstalk you will also find Storm Clouds. There is also a Nimbus bracelet in a present here, which can be obtained by defeating Snow Cloud. If you keep going up the beanstalk you will find a big silver star, that transforms into Dubior, the most annoying boss in Kirby history! Okay, maybe not. Definitely not. Dubior is weak to water attacks, so try your best to use Redwaddle's water burst. After dealing a lot of damage to Dubior, he will turn into Enraged Dubior, a much stronger form of himself. He now is immune to water, but he has a new weakness, which is electricity! Even if he is a robot, he will over heat from it. After casting a few thunder bolts, Enraged Dubior will combust. Now you can finish him off anyway you like. So now that he is defeated, he will just explode into bits again. This will break the blocks behind him, which means you can now access Nimbus Town. There are a lot of Nimbus people here, and very good items. You can buy the Cloud Boots here, which increase your speed. You can also buy the Cupid's Bow, but it is only for Nimbli, which you might've read about earlier in the article. There is also Soft burgers here, which heal 250HP. That's almost a max out for Redwaddle! Of course, these all cost for quite high. Go ask the miners at the west of the town to open up the mine. Sadly, they won't let you because recently some one got lost in there. If you bring them a golden pickaxe they will let you in. Get the golden pickaxe by talking to a fancy Nimbus person wearing a golden top hat. They won't give you it straight away, so show them your Courage Medal (you keep this thing no matter what). You will now have the golden pickaxe. Go to the miners and now you are in the Lost Mines.
In there, there is Rampaging Rubies, Ember Emeralds and Spooky Sapphires. Rampaging Rubies are tough and defencive enemies that do a lot of damage. Ember Emeralds are normal opponents, but they can set you on fire. Spooky Sapphires can haunt your team members, and can even make them run away! This place is basically a maze, but more simple. A map will be shown in the gallery. If you go up, left, up, right, down, right, up and left you will find a room with a door. There is four holes in each corner of the door. Each of them is where a gem can fit in. Kill some Rampaging Rubies, Ember Emeralds and Spooky Sapphires so you can get their gems. Put them in the door holes. But you still won't have enough to open the door! You will now hear a voice saying "Hello there. You killed my minions. No one is allowed to enter that door but me. Now scram, after I beat you two up!" and now Deadly Diamond appears in front of Nima and Redwaddle. The Deadly Diamond is the commander of all the evil gemstones you fought, and he is a pretty tough leader. He does everything his minions do, so he really is deadly. Use a sleepy spell on him so he won't use attacks. While he is asleep, you can use plasma orbs to attack him, or you can smash him with Nima's mallet. Don't use fire or thunder on him, as they might reflect back and do lethal damage. After defeating Deadly Diamond, you will get his gemstone. Now put it in the door and you will be lead outside to the golden cloud.


Nimbli's artwork.
You will see Nimbli but he is frozen. Go back outside to exit the mine. The nimbus person with the golden top hat will tell you that he has spare torches. Go into his house and take a torch. Once again, go to the golden cloud. Melt the ice away that is covering Nimbli and ta-da! You now have a new member! Nimbli will say "Thank you for helping me! Some two guys who appear to be the sun and the moon froze me. Now that I've got the help of you guys, we can save the world from Nightmare! Wait, do you know that Nightmare is attacking?" and if you say Yes he will say "Okay... Nightmare was planning to take over the world, and steal the seven crystals. He would use these to power himself, and to also drain power from everyone else. So we should get moving right?". After getting Nimbli, if you have any spare bracelets from previous worlds, equip it on him. He can use bows and arrows to attack. He uses magic moves based on weathers. He can make it snow to freeze enemies, rain to make enemies feel sad, and also do extra damage and hail stones for damage. After getting Nimbli, he will use a special gold rain to create a path leading to the next cloud. On this cloud, there is the Golden Temple. Go inside if you want that fifth crystal! Or at least open the path to it. The Golden Temple is one of the most dangerous places in the game, because it has Golden Beanbons. These enemies have high attack and high defence, and they're literally all over the entire dungeon! Make sure you've bought the Cupid's Bow for Nimbli. That item will make the enemies more simple, and a new way to get experience points. There's a lot of different rooms to explore. Try and find the room with the key in it. I will show you the map.
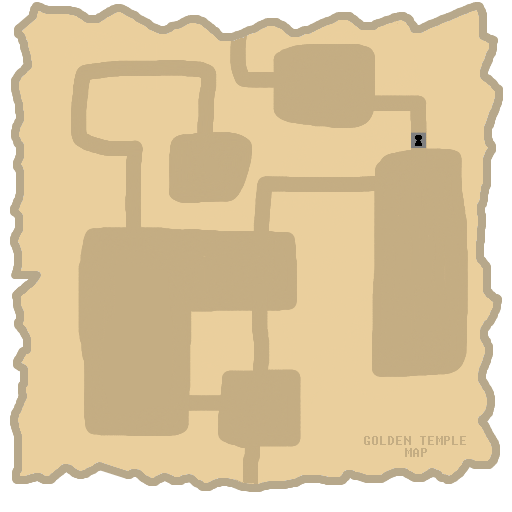

The room with the key in it is the room that is left, up and right from the entrance. Open the door in one of the rooms and walk to the exit of the temple. If you were thinking that it was a short dungeon, you will have to kill a boss. This boss is the Golden Knight. He has 90 defense, 78 attack and 90 luck. This means he will probably kill you in a few hits, and if he gets a lucky hit, you might instantly die! If you have the Nimbus bracelet on Nima, you should be okay. Use Nima's water spell, Redwaddle's water burst and Nimbli's rain cloud. The enemy should start to rust. This lowers their speed and luck. It's defense goes down too. Keep repeating this strategy until the Golden Knight becomes completely rusty, which the game will tell you when. This will end the battle, and all that's left is the knight standing infront of you. You can take it's armour if you want +40 defense. If you go back to Nima's home town, and into the mechanic's house, you may fix it and turn it back to golden armour which gives +90 defense, which is a reference to the Golden Knight's defense at the start of the battle. If you fixed the armour, go back to the Golden Temple using Nimbli's teleport cloud. There is another Golden Temple past the bridge after the first one. In the game's files it is called "golden_temple2".
There is a bridge after the golden temple cloud. Cross it to go to the second golden temple. This part is much bigger than the first one, and it has Golden Beanbons, Spear Knights and Golden Bats. Spear Knights use their pointy spears to jab you, and do a lot of damage! Their minimum damage is 90, and max damage is 160! Since there is defense items to help you, you will probably take less damage. Golden Bats can make a supersonic screech to make party members dizzy, and they can also spray golden poison. Bad things about these guys: They are pretty annoying, They do a ton of damage. Good things: They give LOADS of experience points and gold. All the enemies have been hypnotised if you didn't know, so there is a way to get them back to normal. You can turn Spear Knights back to normal by using Nima's love spell. Defeating the enemies doesn't kill them, it just turns them back to normal.... sorry if I mentioned kill before this. Back to the dungeon, so now that you're in, go left and you will find a room full of Golden Beanbons. You can turn them back to normal instantly, unlike individual Golden Beanbons. If you use Nima's love spell about six times, they will become passive. Only specific enemies can be turned passive, and defeating foes is just a longer way to do it... however, choosing the path to defeat enemies is needed because of bosses. Golden Beanbons on their own can't be turned passive, and turning enemies passive gives you half the experience. The group of Golden Beanbons will now tell you where to go next. There is a crack in the wall, so use Redwaddle's blast spell to break it. But wait, you don't have that yet! So go right, then up and you will find a long hall with a lot of torches. Walk up the path and you will see a Nimbus person who is looking at a throne. If you talk to him, he will then turn to you. He will smile, but then his eyes will turn orange and he will morph into Cloudsphere. To do damage to him on his first form, shoot any projectile at him. He has a Melee Shield at the start of the battle. When he turns red, he will now have a Magic Shield. Use melee/bash attacks on him until he fades away. Cloudsphere will then melt into thin air, and the Nimbus King will fall down from the sky. He will then tell you to take his jewel so you can learn the bomb spell. Put it on Redwaddle, and he will then start to meditate. After a while it will say "Redwaddle realised the power of Bomb Blast α" so now head back to the Beanbon room and blow up the crack. You will now be in the forbidden area of the temple. The enemy, Cursed Mummy is able to haunt you, and poison you so beware. There is also Vampires here which will take away your health and heal themselves. The thing you will want to have to avoid poisoning is the Purification Pendant. You will get this by doing certain quests which will be in the article later. Try dodge all the enemies if you don't want to have a bad time. Just keep following the dusty path and you will soon find the ancient hieroglyphs. If you read them, you won't be able to understand them. Nimbli will write them down on a notepad. If he doesn't have a notepad, talk to the Nimbus King again. Go back to the Golden Beanbon room, and talk to the elder beanbon. He will translate the hieroglyphs for you. They say "The hero may return to it's home, only to find the Diamond Pearl. Must thee return to the temple and call for the gods.". Go back to Nima's hometown, and go to the fountain. You will see a Diamond Pearl inside the fountain. Take it, and then teleport to the temple.
Now go back into the forbidden area, and put the Diamond Pearl in the shrine. When you do this, the happy music when you get a crystal will play, but a corrupted spirit will appear and the music will slow down until it cannot be heard. The corrupted spirit will take the Diamond Pearl, and introduce themselves. They call themselves The Corrupter, but you already know what to do next right? Defeat him and get the pearl back! This guy can use many strong attacks. The one to beware of is Cursed Vortex. This will probably instant kill your party members. To dodge it, use the psychic shield and you will be ok. It might even reflect the attack, but he's already a corrupted type enemy. Use light attacks on this guy if you want to defeat him quickly. Using a Purifier will also do a lot of damage (600) to him. Once he coughs and says that you are very strong, this is when he has not much health left. You can instantly defeat this guy if you are lucky hitting him with the mallet. When he is defeated, he will fade away. An angel will fly down to you and give you the crystal. "I believe this is for you people. Take it and stop Nightmare from destroying the world."
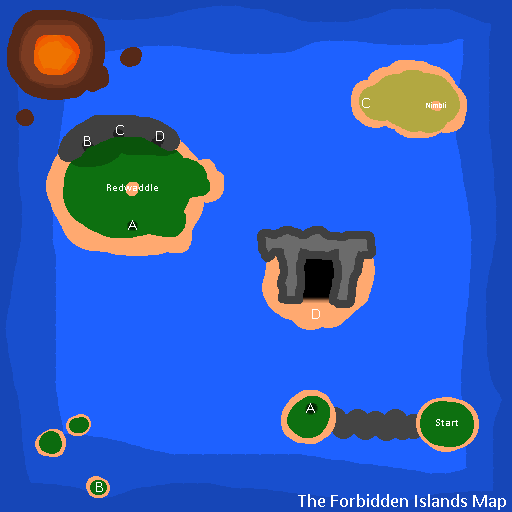
Chapter 6 - Stranded In The Forbidden Islands[]

After you get the 5th crystal, the exit door will shut. The ground will start to shake. A few seconds after, you will be surrounded by fog and you will black out. When you wake up, you will be on a small island. Everything seems pretty normal, apart from the fact that the rest of your party has disappeared! And how are you supposed to escape?!? Teleportation is disabled for this chapter. Now that you are on the island, head to the west and go into the tunnel. In this tunnel there will be Golden Bats, so watch out for them. Head through the tunnel and find the exit. When you go outside the tunnel, you will be on a plateau like island. Redwaddle will be in lying in a patch of sand in the middle of the plateau. If you try waking him up, he will sink into the sand and disappear! Go up to find 3 caves. These caves will lead to different places. Cave B contains Tropical Crawlers and Venom Bats. Venom Bats can badly poison you and and Tropical Crawlers can put you to sleep. However, these enemies are a great source of experience points! Cave B will lead to a small island in the southwest, where there is a shop. For Nima, you can buy an Exotic Mallet, which is superior to the Steel Mallet. Heads up, it has a smaller hit rate. For Redwaddle, you can buy a Psychic Ring, which will increase his psychic damage. For Nimbli, you can buy a Tropical Bow. It will rarely poison enemies, which can be handy at times. There is also a Seasalt Bracelet on sale. Cave C has no enemies in it, and it will lead to a savannah like island in the northeast. Cave D has a few Golden Bats in it and it leads to the Ocean Ruins, which is inaccessible before the two lost party members sink. Head through Cave C. Once you are outside, head east and you will find Nimbli lying in a patch of sand. If you try waking him up, he will sink into the sand and disappear! Go head back to the cave. Suddenly the ground will start to shake for a few seconds. It seems like nothing has happened. Go back to the plateau and go through Cave D. When you get out, you will see a huge stone monument in front of you. This place is called the Ocean Ruins. Head north and go inside.
When you enter in the ruins, you will be in a big room. There will be 3 golden lanterns in the middle of the room and they are not lit. There is a block with text on it infront of the lanterns. It says "Light the candles, and the path will become clear." Well, how do you light these candles? There is a door at the right of the room, a door at the left of the room, and a door at the top of the room. The door on the right is the only one that is not blocked at this moment, so go in there. There is a small bit of water in this room that is covering the floor. This room contains a lot of piranhas as well, so watch out for them as they can do a lot of damage. Head through the room until you find a big door. If you go inside, the door will lock behind you and to get out, you must face a mini-boss! In the middle of the room is a big statue that looks like Sir Kibble. Suddenly, the statue will start to move towards you, and a fight will begin. This mini-boss is called the East Guardian. They are very defencive and if given time, they will do a lot of damage. They have to charge up their attack. The mallet is very effective on them, so use that. This boss is very easy if you defend at the right time. When you defeat them, they will explode and a cutscene will play, showing the lantern on the right being lit with a red flame. The door on the left will also open up. Head back into the main room and then go into the door on the left.
There is a lot of cracked tiles and wind in this room. If the tiles break and you fall, you will land in the basement of the ruins. To get back up, you must defeat enemies to make a portal back to the main room appear. The basement will reset every time you go in it, so try not to fall. The wind will also blow you around into various pits. When you make your way through the room, you will find the mini-boss room. There is a big statue that looks like a Blade Knight. Like the previous mini-boss, they will move towards you and trigger a fight. As you can tell, this mini-boss is called the West Guardian. Unlike the last mini-boss, they have very low defence. Their attacks do a decent amount of damage. This boss might be hard if you're not ready. When you defeat them, they will explode and a cutscene will play, showing the lantern on the left being lit with a green flame. The door at the top of the main room will also open up. Head back into the main room and then go into the door at the top of the room.
In this room you will have to face a bunch of enemies to open the mini-boss door. Firstly there will be 3 Golden Bats. Secondly there will be 3 Tropical Crawlers. Thirdly, Gigant Edge will appear a second time. Finally, there will be a Plasm Knight. This mini-boss is a very unique enemy. It will not take any damage from any attacks until it is in it's solidified form. To solidify them, you must use Nima's Flaming Smash attack 5 times on it. Hit it a few times when it is solidified and it will explode. The mini-boss door will unlock and you can go inside. There is a big statue that looks like Poppy Bros. Jr. Like the previous mini-bosses, they will move towards you and trigger a fight. Once again, you can tell this boss is called the North Guardian. This boss has average defence and average damage. They will sometimes detonate a bomb which will explode in 3 turns. If it explodes, it will do lethal damage to Nima. Defeat them and they will explode and a cutscene will play, showing the lantern at the top being lit with a blue flame. Go back into the main room, and stand in the middle of the 3 lanterns.
Suddenly, the platform beneath the 3 lanterns will begin acting like an elevator, and will lift you up to the second floor of the ruins. Here you will find the Sinking Sand Boots! These will let you sink inside the patches of sand that Redwaddle and Nimbli sank through. Go back down the elevator and exit the ruins.
Next go back through Cave D. Now that you are on the plateau again, go to Redwaddle's patch of sand and sink into it. You will then fall into a very dark cave. Your flashlight will only emit a small amount of light. In this cave you will find many Dark Arachnids. They usually come in groups because they are quite weak. Redwaddle will be found being carried around the cave by a group of Mariels. When you go close to them they will get scared and run away, thus dropping Redwaddle. If you interact with him, they will wake up and say "..ungh...w-where am I.. Oh! Hello Nima! What happened? ..Hmm.. Mhm. Okay. So we're in the middle of the ocean and all of us got separated? And me and Nimbli sank into a pool of sand? ...As long as I'm alive!" Redwaddle will rejoin your party. Now to get out head north until you find a big rock. Redwaddle will push this rock using his powers. Underneath the rock is a geyser which will boost Nima and Redwaddle out of the cave. You will land back on the plateau. Head through Cave C and go to Nimbli's patch of sand. Sink into it and you will land in the same kind of cave. Go up into another room. There will be three doors, one at each side of the screen. If you go in the right one, you will advance to the next set of doors. If you don't go in the right one, you are sent back to the first room. Go up, right, left, left, up, up, right, and you will end up in the room that Nimbli is in. Interact with them and they will wake up. "Oh hello Nima! ...uh..Why am I here? Tell me what happened on the way outside." Nimbli will rejoin your party. Now head north and there will be a wooden target. Use Nimbli's bow to hit this target. Once you hit it, a geyser will appear underneath you. It will boost you out of the cave and you will land on the plateau. A cutscene will play, and the camera will zoom to a volcano in the northwest of the plateau. The screen will start to shake, and the volcano will erupt. Redwaddle will then say "I sense a crystal near that volcano. We should go there, but I'm not sure how."
Chapter 7 - Puff Puff Heights[]
TBA
Chapter 8 - It's not the End[]
TBA
Chapter X - Final Encounter[]
Not much is confirmed yet, but this chapter is a secret chapter, and is unlocked by getting the Enchanted Apple to open up the gates at the dark dimension. When you open up the gates you find Neoma and Nightmare creating some kind of weapon. When they finish they call for someone. Soul Knight then appears and steals the weapon. You've got all your items equipped, and everything ready to go hopefully. Best of luck on beating Soul Knight!
Secrets & Glitches[]
Glitch - Rocket Nima[]
There is a glitch that can make Nima launch into the sky. You can trigger it by jumping on jelly and then slowly moving to the left of the jelly. You should soon clip inside it just a tiny bit. You will then need to move in to the right and Nima should start spazzing around. If you move left again to get out, Nima will fly into the heavens. Not much is up here although, and you can't move so it's kind of useless, but you can see hidden models that were scrapped.
Glitch - Invisible Friends[]
You can make your party turn invisible. This won't affect Nima though. You can trigger it by going into a secret place that only Nima can enter (e.g. Shrine of True Heroes). Before going in you must get a moving enemy or NPC that will push you into that place. You must also have your item box open. Keep your item box visible and wait for the NPC to push you in. Now you will be in the place that Nima can only go to with the item box open. Scroll over each party members' inventory and exit the place. Now everyone in your party except you will be invisible. This won't do anything and can be ended by going into the place again. You know, the place that only Nima can enter?
Status Effects[]
Scared[]
If you're scared, you will have a 3 in 10 chance of hitting the opponent. This is a very bad status effect, as it can happen to Nima, who is probably going to be the strongest member in the team. To become a bit less scared, you can drink Golden Potions or use Redwaddle's healing move that still works on him even if he's scared. Or you can wear the Confidence Medal so you can be never scared again.
Haunted[]
This is when you don't become less scared. It is a very mean debuff, and you will probably miss all of the time. If a party member has this for too long they will flee from the battle. Also, while they have this debuff, their defence goes down by 5.
On Fire[]
While you're on fire, you will take about 5 damage per turn. Not so lethal, but still can be very bad if you took a lot of damage from an enemy. The worse version of this debuff is Burning.
Burning[]
If a party member is burning you're gonna have a bad time. You will take 15 damage instead of 5 damage per turn, and also your defence is lowered by 5, and your attack is also lowered by 5. Luckily, Redwaddle starts off with a few water buckets, so you can pour them on him, or another party member to stop this effect.
Amiibo Support[]
Bonus content can be unlocked using the amiibos, such as Goombas as enemies and Metroids as enemies. All this content can be seen in the bonus content at the title screen.
Any Mario amiibo[]
Any of these amiibos unlock bonus content. By that, I mean they unlock a new place in the bonus content called the Mushroom Kingdom. There are lots of Mario enemies here, Goombas, Koopas, Waddlewings and more. The boss of the new stage is a Big Bully from Mario 64. There is also exclusive star coin items here which increase defence, but the defence will go away after exiting or completing the stage. The enemies are meant to be almost as strong as you, so if Nima is a high level, the enemies will be a bit hard for Nima.
Any Kirby amiibo[]
Any Kirby amiibo will open up a new passage in the main story. Here you can find tips and tricks on how to battle enemies. It also unlocks a new stage in the bonus content. Here you can fight tougher versions of the enemies you usually fight, or new enemies that appeared in the Kirby series and not in the Nima series. Just like the Mario stage, the enemies are put to be as strong as you, but in this case they're tough enemies so they will be stronger. The boss is King Dedede, a guy who never appeared in this game until now.
Any Mother amiibo[]
Any amiibo from the Mother series will unlock new stages in bonus content. Yes, I said stages. There are enemies like Starmen in it. The boss of the first pack is Master Belch and the boss of the second pack is Titanic Ant.
Trivia[]
- The game was inspired by EarthBound, as this game is an RPG and when fighting an enemy, it is very similar to EarthBound.
- The game also has four party members, and EarthBound has four party members.
- As I said the game was inspired by EarthBound, not inspired by The Adventures of White. This is just a little "fun" fact.
- Nima backwards is Amin. This was not intended!
- In the credits at the end, there is special thanks. During this you can see Ape Inc./Creatures Inc.
- Soul Knight makes his second appearance in this game, his first being in Kirby U: Ocean Adventure.
- Enraged Dubior is weak to electricity, however normal Dubior isn't. That's just my weird logic.
Gallery[]
")
")
")
")