A list of Assist Trophies and Pokémon in Super Smash Bros. Crimson Sky - Indigo Night.
Assist Trophies[]
| Image | Name | Effect |
|---|---|---|

|
Ballyhoo & Big Top Mario |
When he appears, he flies around the stage while speech bubbles appear to convey his excitement. He usually comments at things like “Everyone is fighting brilliantly!” and “(Characters Name) fighting spirit is START-TACULAR!” His speech bubbles and antics can distract players and cause visibility problems. He will then fly to the top of the stage and one of five things will fly out of Big Top’s head:
Then bids the match farewell and vanishes. |
|
Cataquack Mario |
A lone cataquack quickly charges at the nearest foe, and flings them up into the air. This deals slight damage, but more importantly, it really sends the player flying. Like most attacks, their launch distance is determined by their damage, and if it’s any higher than 40 percent, they’re likely to be star KO’d off the top of the screen. After Cataquack attacks, it disappears. The whole process only takes about 4 seconds. |

|
Funky Kong Donkey Kong |
Funky Kong appears and places everyone into a flight barrel that begins to spin around. Pressing the A button will cause a player to shoot our for high knock back; even the player who summoned him. If a player does not press A, the barrel will shoot the person out after 10 seconds. It can be a possible OHKO if shot towards the end of the stage. |

|
Mona Wario |
She appears on her trademark scooter and begins driving back forth on the main platforms. Getting hit by her only does 15% damage and very low knock back. However, she stops, looks at her watch and says “I’m late!” and begins rushing about the stage in a panic. She drives much faster and drives fairly recklessly. She does 30% damage and very high knock back. After 6 seconds, she vanishes. |
|
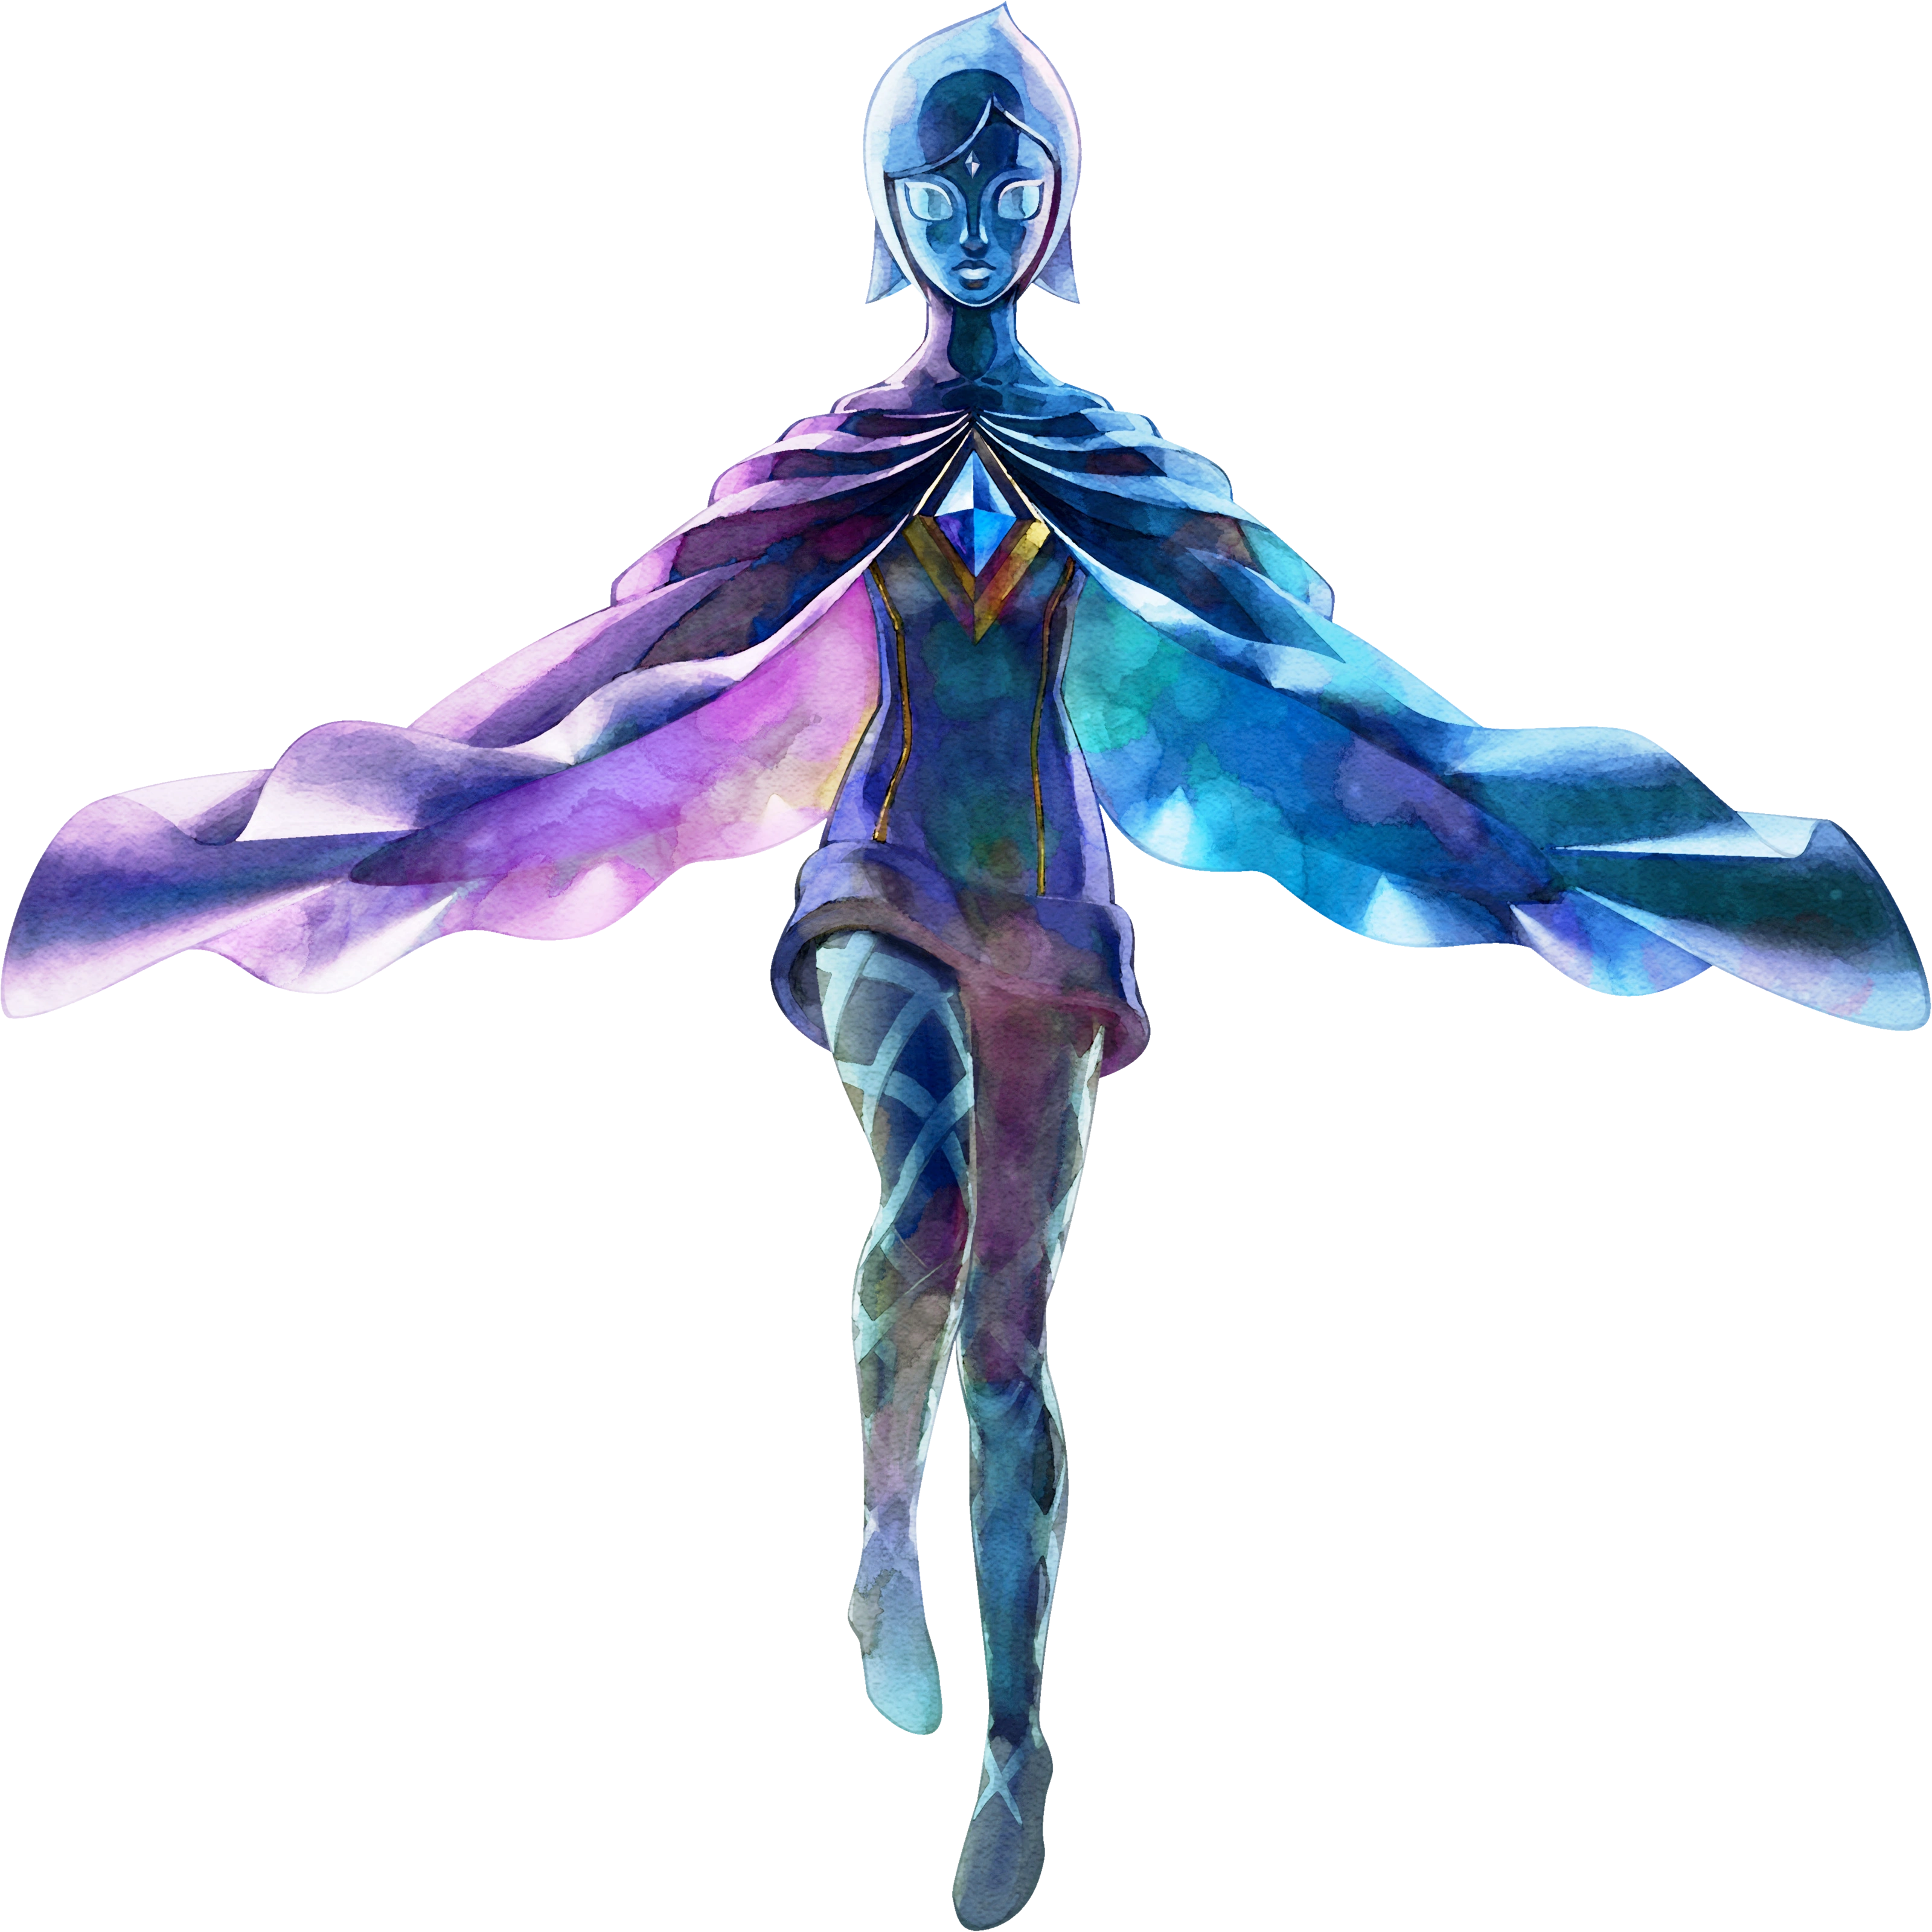
Fi Legend of Zelda |
When summoned, Fi begins skating about the stage and, in a instant, the entire stages freezes with crystal. The entire view of the stage is distorted and everyone is frozen in place – even the player who summoned her. As soon as the frozen crystal appeared, it vanishes and everything cracks apart. Everyone besides the summoner is dealt high damage between 55-65% damage and can easily KO. |
|
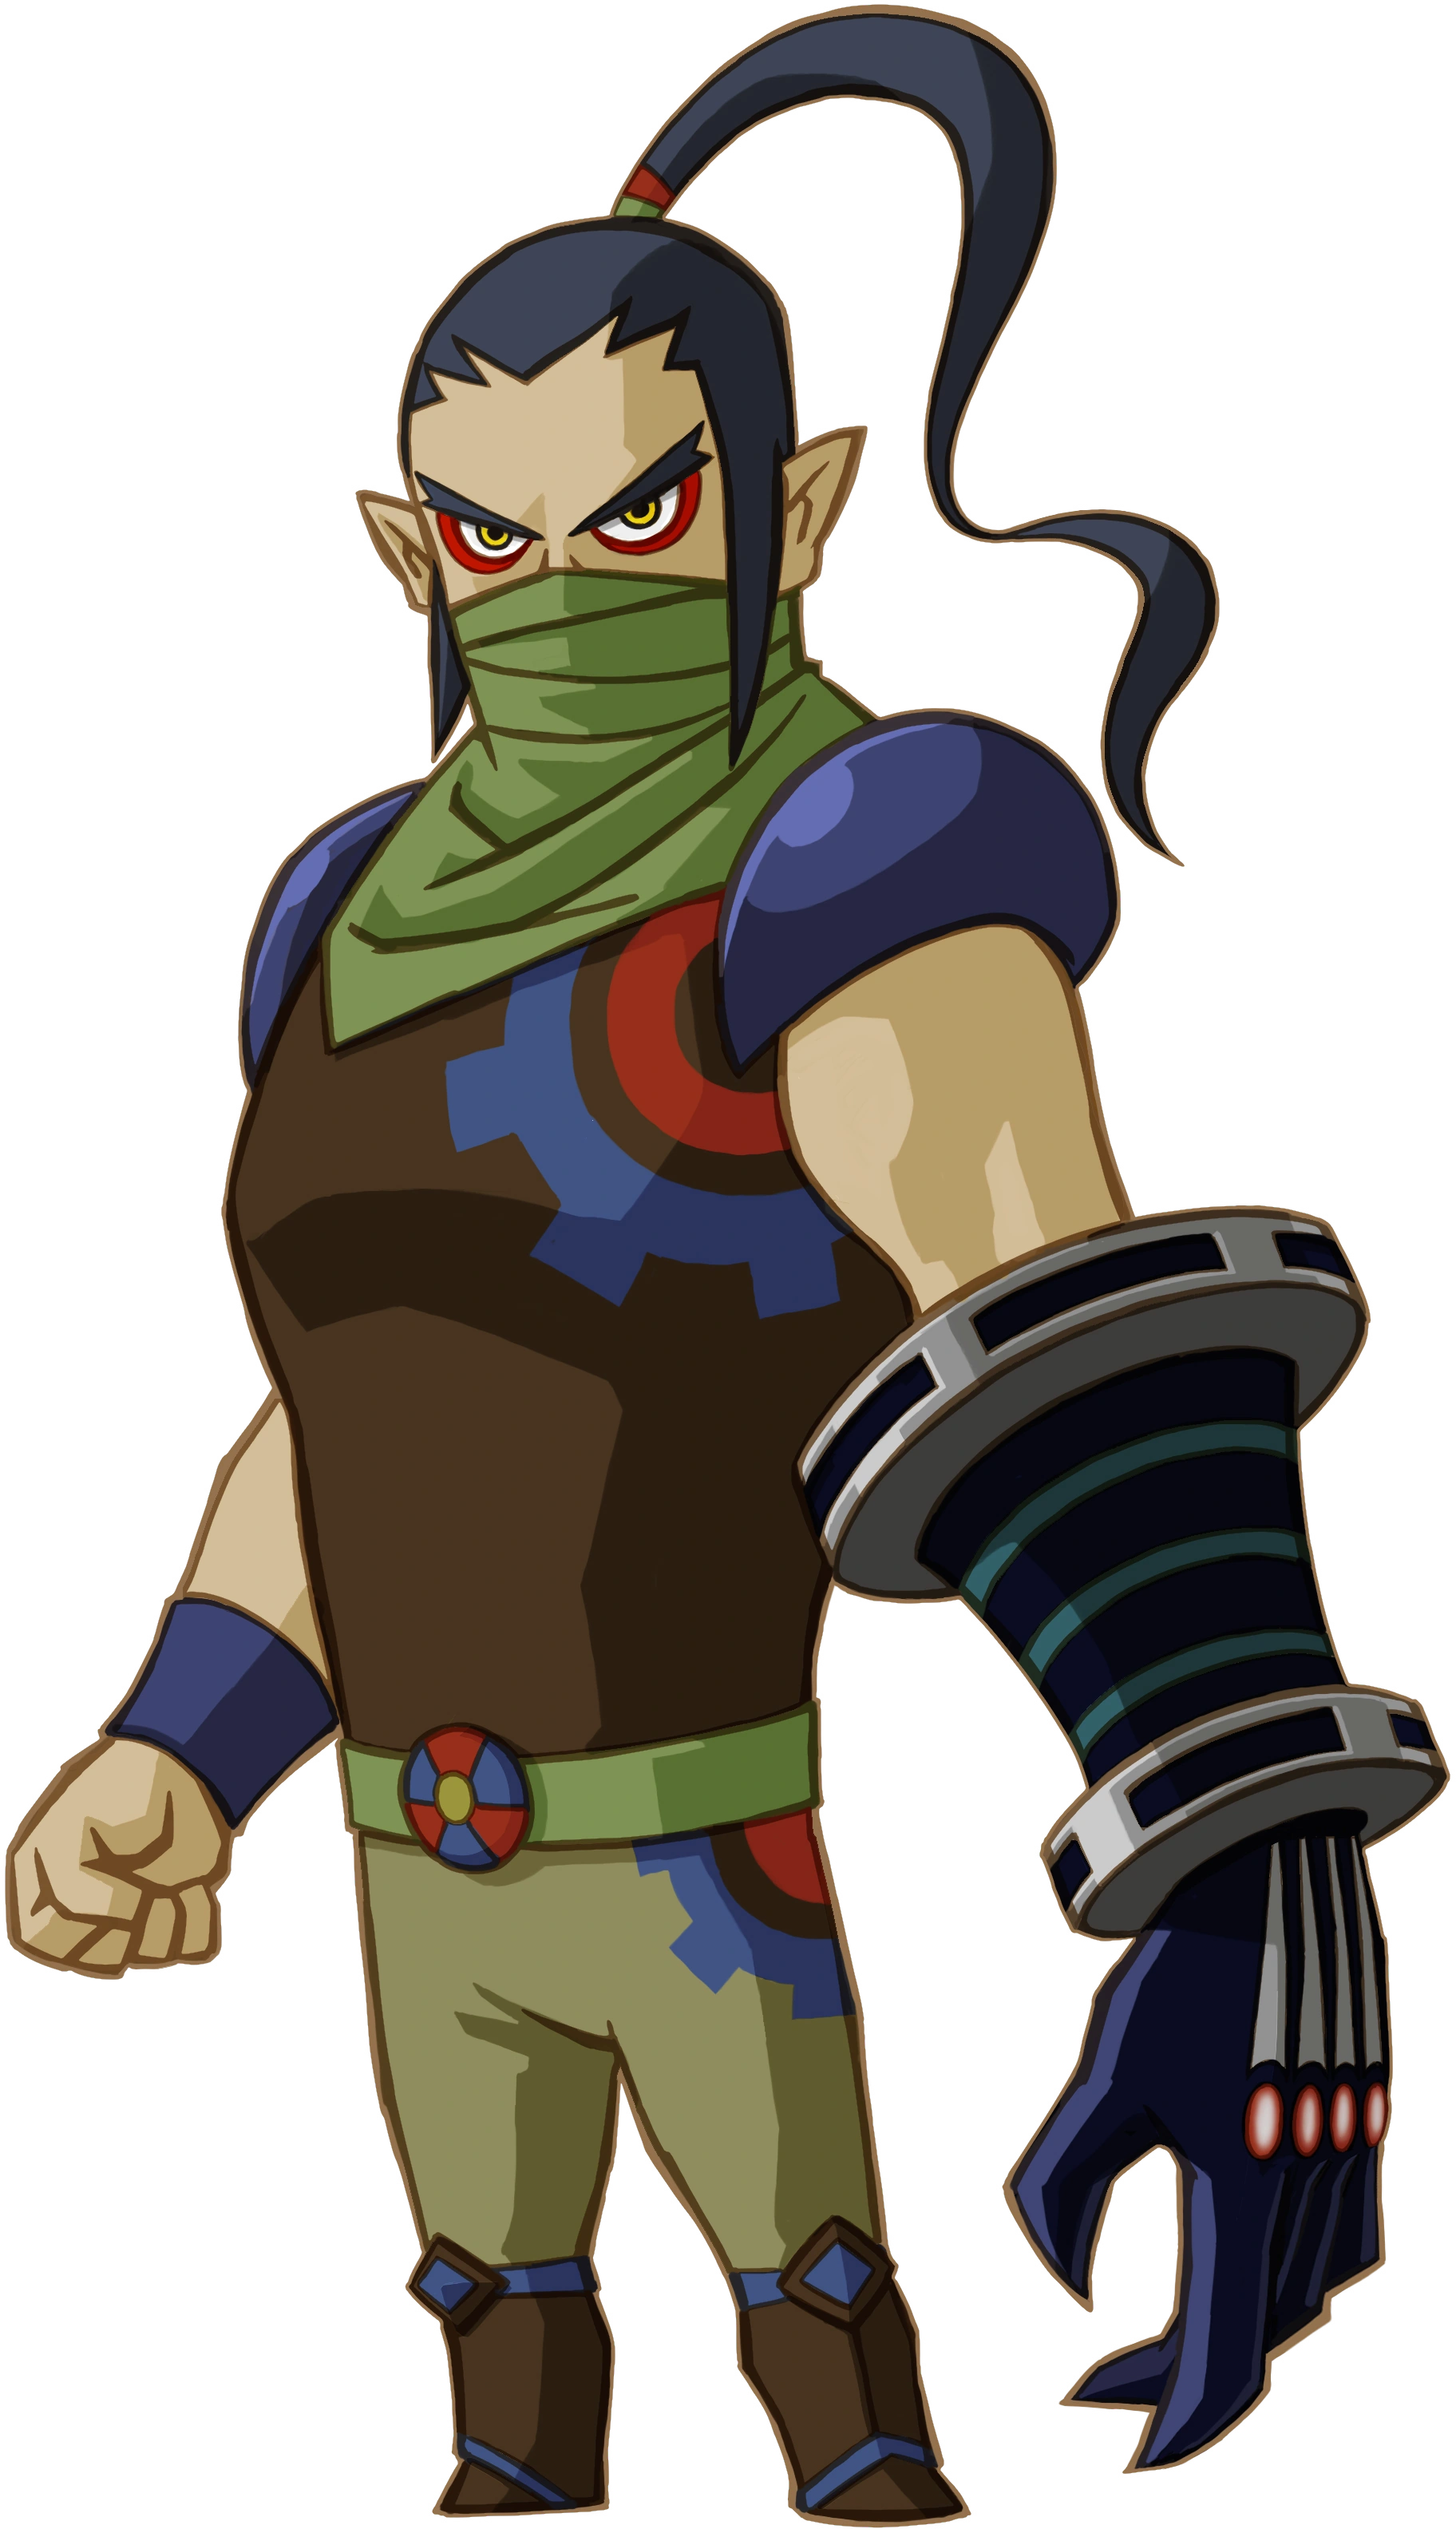
Byrne Legend of Zelda |
Working as a “chase and attack” Assist Trophy, he’d pursue his summoner’s enemies with swipes from his clawed gauntlet. He’d also jump into the air and launch white bursts of magic, which have a slight stun effect, which his AI-controlled assault would take advantage of. Byrne’s most unique technique is his ability to launch his gauntlet on a chain. If Byrne manages to grab an opponent with his long-range gauntlet technique, then the end result would not be pretty for the player involved. |
|
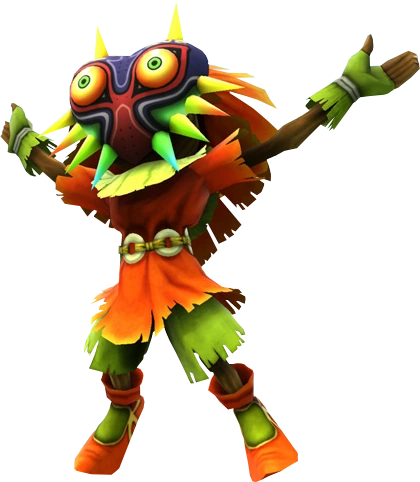
Skull Kid Legend of Zelda |
When summoned from an Assist Trophy, a single Skull Kid appears in the background, and begins playing a short part of Saria’s Song on his flute. For about 8 seconds, the enemy players are subjected to following 6 button input commands that appear over their heads. Commands corresponding to buttons on the 3DS and Wii U controller, would have to be correctly met by the other players. Any time an input is missed, the Skull Kid would fire a poisoned dart from his flute at the player. The poison would deal 1% damage per second over 5 seconds, and damage would stack if hit by multiple darts. Skull Kid would cackle teasingly before vanishing. |

|
Rundas Metroid |
He emerges onto the battlefield, jumps high into the air, and then lands back down. When he lands, the entire stage erupts in spikes of ice and go in every direction. It can deal between 20-40% damage and deliver above-average knock back. Rundas will then vanish along with his ice. |
|
Anthony Higgs Metroid |
He jumps into the fray and begins firing gun rounds at opponents. He walks forward,slowly but surely with guns blazing. He then does a dramatic back flip while firing his pistol. He then charges forward and does a impressive shoulder charge for one last hit. The gun round bursts do 5% damage each hit. They hit between 8-10 times. The pistol does 3% damage and hits twice. The shoulder rush then does a final 20% damage. If hit altogether and with each hit connecting, it can do 76% damage but, most likely, it won’t connect every hit. The gun round and pistol shots do little knock back but the shoulder charge has the highest and can KO at mid to high percentages. | |
|
Magnus Kid Icarus |
Magnus appears and slams into the closest opponent with his shoulder. This attack does 12-15% damage. He than slams his sword down and then up for a combined attacked of 10% altogether. He then begins to attack the opponent unmercifully in the air with rapid attacks that does up to 25% damage with a final diagonally slam into the ground that does high vertical knock back and a explosive radius that can damage nearby opponents. A very KO’able attack. | |
|
NS Ironbat Sin and Punishment |
The NS Ironbat appears behind the stage and starts bombarding it with rocket fire. Each rocket can do 20% damage and high knock back. It will then disappear and then re-appear by flying over the stage and dropping bombs. The bombs do 30% damage and above-average knock back. However, they are slow, predictable, and have a small blast range. It’s last phase it will appear behind the stage again and it will start firing it’s wing guns at opponents. It does 5% damage for each hit. After 5 seconds, will will take off and above the screen. | |
|
Felix Golden Sun |
Felix appears and begins a massive Earthquake that shakes everyone until they fall. Shortly after the Earthquake begins, stalagmites appear and pierce everyone that is on the ground. It does high knock back and damage at 55% damage. The attack is fairly quick and doesn`t affect anyone who is in the air at the time. During the Earthquake, it is impossible to jump or move since the opponent is being staggered. During this time, they are helpess to the stalagmites. | |
|
Matthew Golden Sun |
Matthew appears and does Earthquake. He causes the entire stage to shake violently and induce tripping and falling during the attacks duration. It does 3% damage during it’s duration and lasts for 10 seconds. The player who summoned him is unaffected. | |
|
King Hippo Punch-Out!! |
He will lumber onto the stage and deliver a powerful punch attack that will OHKO if it connects. He will then rush forward and deliver a series of shorter punches and jabs that do around 15% each. His final attack is that he slams his fists down for 25% damage and can KO most opponents. | |
|
Ray 01 Custom Robo |
Ray 01 appears and begins to fire his gun around the stage. Each hit does around 12% Lightning damage. It will then release four smaller satellites that circle around him and fire of plasma shots as well. These only do 1% damage but have a much higher rate of fire. Ray 01 is moving around the stage and firing during this time. After 9 seconds, Ray 01 vanishes like a hologram. | |
|
Heavy Lobster Kirby |
Heavy Lobster appears and will begin walking around the stage while using it’s flame throwers. The flame throwers do around 15% damage. It will then begin jumping around the stage trying to squash opponents. It does 20% damage if it jumps on a player. Lastly, it will release a barrage of missiles that travel across the stage and does 6% damage each hit. | |
|
Bandana Waddle Dee Kirby |
Bandana Waddle Dee appears and begins striking opponents with his spear. Each attack from his spear does 12% damage and high knock back. He then does a rapid strike that does 3% damage each hit can hit 10 times. Lastly, he starts twirling his spear above his head and begins to fly to the top of the screen. He then takes his spear and drops down in a thundering slam on the stage. It does 50% damage overall. | |
|
Tarantula Animal Crossing |
Tarantula will not attack players unless a player does an attack. Once a player, even the one who summoned it, does an attack, it will start to chase the player down until it stings them. The tarantulas attack is devastating. It can do around 55% damage and very high knockback. It is almost always a OHKO. However, stepping on it can squash it but that takes some skill. | |
|
Konk The Legendary Starfy |
When he appears, Konk unleashes hell with a relentless onslaught of spinning. Twirling around in his conical, spiked shell, Konk would fly around the screen like a miniature tornado. Players near Konk would be pulled in and shredded up like berries in a blender. During his time on-screen, Konk would periodically stop spinning for a few seconds to reorient his dizzy self. When he ceases spinning, any players he had trapped in his attack would be launched. Konk would be able to KO a player high enough in damage this way. Konk would attack 3 to 4 times before leaving. | |
|
Octoman F-Zero |
As an Assist Trophy, this anthropomorphic cephalopod begins to dance, gyrating and waving his tentacles. If an enemy gets near, he angrily grabs them, lifting them as he continues dancing. The grabbed character takes no damage in Octoman’s grip, but, in their state of restraint, they can be attacked by other players. Just make sure that, if you’re one of those other players, to not get too close to Octoman. | |
|
Pegasus Knights Fire Emblem |
Pegasus Knights appear and instantly begin swooping and striking opponents. Ten Pegasus Knights appear and begin striking opponents. They deal more damage in the air than on the ground. Opponents hit in the air receives around 25% damage while those on the ground receives 20% damage. They do two attack sweeps before disappearing. | |
|
Micaiah Fire Emblem |
Micaiah appears and casts a glowing white ball of light onto the top of the screen. It starts to pulsate and rotate. It finally starts to shoot random rays of light around the stage. That can bypass platforms and solid objects and will destroy breakable objects. Opponents to are hit by the attacks receive 20% Light damage and does moderate knock back. If the rays hit the person who summoned Micaiah, it does heals 10% worth of damage from the player. The attack lasts for 10 seconds in which, the rays will diminish and Micaiah will disappear. | |
|
Tiki Fire Emblem |
When summoned, Tiki transforms into a white dragon. She roars, and then breathes a blast of greenish white flame straight forward. Tiki breathes three bursts of fire, each of which has decent KO potential and a damage output of 35 percent, before disappearing. | |
|
Kumatora EarthBound |
Kumatora appears and immediately uses one of her signature attacks, PK Starstorm. The attack is much alike to Ness and Lucas’ attacks in Super Smash Bros. Brawl but in a very weaker form. However, the comets are very fast and whistle past characters. It has the ability to inflict wide damage and juggle characters in the air. After 9 or 10 comets pass by, the attack ends. | |
|
Sami Advance Wars |
Sami appears on the stage and immedaitely summons soliders onto the battlefield. They begin firing rounds of ammunition in a straight line against the opponents. Each round does around 8% damage and has moderate knock back. Sami also fires her machine gun which does only 4% damage but is has a much higher rate of fire allowing for hits to occur. After 12 seconds, she vanishes when a whistle blows. | |
|
T-Rex Fossil Fighters |
The T-Rex appears and starts stomping across the stage while gnashing its teeth and swiping its massive tail back and forth. It does around 10% damage. T-Rex will then turn around and charge forward and bites down hard with its teeth. It does 25% damage if its a full bite and 15% damage if its half a bite. T-Rex then vanishes. | |
|
Warrior Mech Gauss Chōsōjū Mecha MG |
Warrior Mech Gauss appears on the battlefield and readies his special beam attack which fires from the tip of his sword. He then fires it and it tears along the ground. It boasts high knock back damage and does upwards to 60% damage if it hits 100%. Warrior Mech Gauss then jumps up and vanishes. | |
|
Karate Joe Rhythm Heaven |
His attacks would be punching paper cups at opponents for a while, to the beat of the current background music. They would then have to dodge them at the right time. Each cup by itself gives little damage, but occasionally, he’ll punch a soccer ball or a rock, which both causes much more damage and goes a bit faster. To “warn” you about when they appear, he punches away a lightbulb right before. After hitting one or two rocks/soccer balls, he would disappear. | |
|
Xord Xenoblade |
He appears on the stage and immediately performs it’s signature attack, Xord Crush. He activates his jet booster and crashes along the length of the stage. This attack is capable of doing 35% damage and deal high knock back. He then lumbers forward and starts striking with his massive hammer. Each hit does 18% damage and high knock back. | |
|
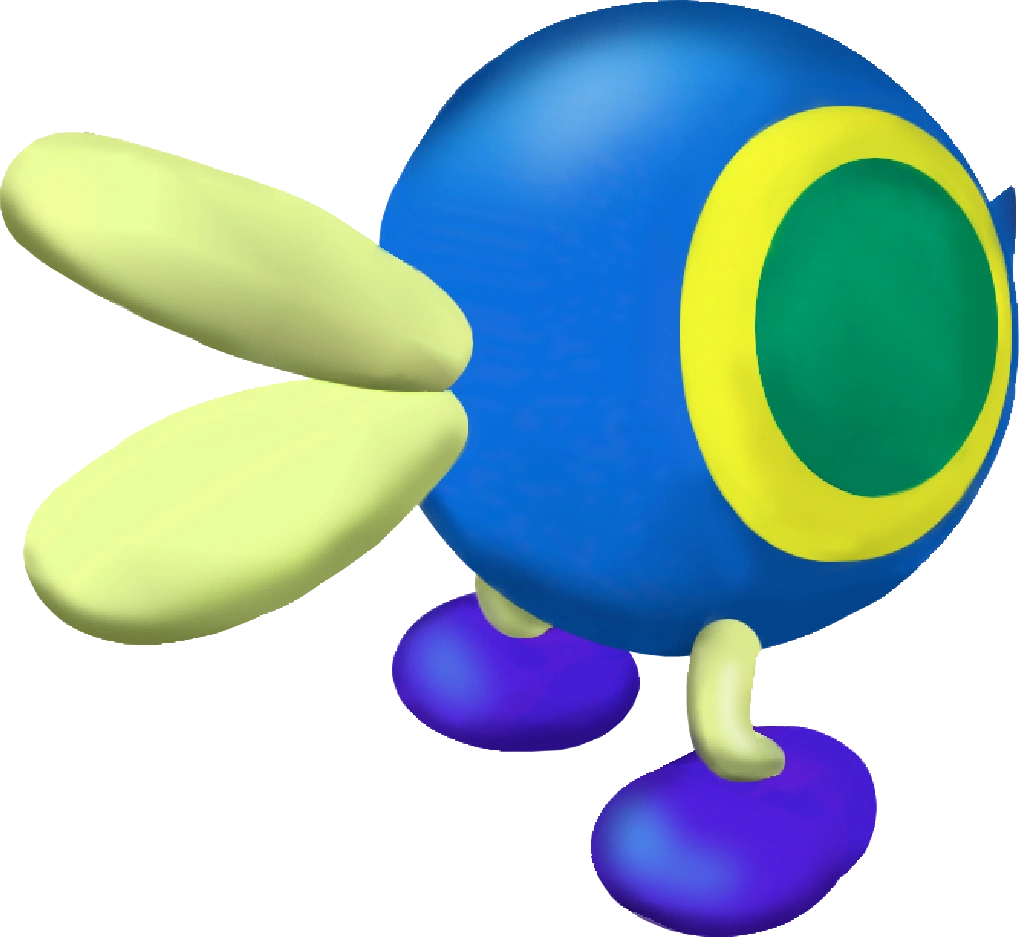
Mokka Magical Starsign |
When Mokka appears, he’d stand in place, feet firmly planted in the ground. He’d stomp one foot into the ground in front of him; anyone contacted by the robot’s foot or the small shockwave it sends out would be stuck in the ground, as if they had been hit by a pitfall item. Raising an arm, Mokka uses his earth magic to cast Stalagmiter, a spell that causes a massive stone stalagmite to rise from the ground. The rocky spire would pop up about two character spaces in front of Mokka, dealing a good chunk of damage to anyone hit and propelling them into the air. | |
|
John Raimi Geist |
John Raimi, when summoned from an Assist Trophy, appears in his ghost form, and flies over to an enemy. Shouting “boo!” in an attempt to startle the player, he causes them to freeze up in fright, giving him a window to possess them. While possessed, the player is controlled by a low-level CPU that focuses on wandering about rather than fighting, giving the summoner the perfect opportunity to attack. However, John can be avoided by facing in the opposite direction of his shout, and he’ll give up and disappear, rising into the air as he fades away. | |
|
Alexandra Roivas Eternal Darkness |
When brought forth from an Assist Trophy, nothing would happen at first. It would appear to the players that the item was a dud. Abruptly, however, the camera would skew at an odd angle, accompanied by discomforting noises, cries, and whispers. Then, one of the various “sanity effects” of the game would occur. The screen would cut to a blue BIOS menu or “VIDEO 1” screen. Monsters would appear on-screen, attacking the player’s enemies (but not actually causing damage, since it’s all psychological). After a traumatizing experience of any variety of sanity effect, the screen would return to normal, “pulsing” like a person’s blurred vision. Alexandra would be seen on-screen as if she had always been there, and run off the stage as if she were fleeing from a monster, traumatically screaming “This can’t be happening!” | |
|
Ouendan Ouendan |
The Ouendan comes charging out and begins dancing and chanting. This boosts the attack power, speed and shield strength. They do 3% damage if a opponent runs into them while they are dancing. This lasts for 12 seconds before they leave. | |
|
Polar Bear Ice Climber |
When summoned from an Assist Trophy, the polar bear will begin walking back and forth across whatever platform he was spawned on, and will bounce and push players around when they contact him. | |
|
Ayumi Tachibana Famicom Detective Club |
She investigates who has been cheating/playing dirty while during the match. She searches for: – Edgehogging – Projectile Camping – Excessive taunting – Move Spamming – Kill Stealing – Friendly Fire – Item Stealing – Stalling. She then compares amongst the other players. If a player has done thus more than the others, she will accuse them which appears as a giant gavel that crashes onto the opponent. It is always a OHKO. But be careful because she may judge you as well! | |
|
Taizo Hori Dig Dug |
He hops onto the screen by burrowing out of the ground, poses triumphantly, then immediately gets to work. Taizo chases after players with surprising speed, trying to grab them. He attempts to get a hold on them by extending his pump at full-length, as he did in Dig-Dug, and causing it to attach. If he makes a connection, the player is then pumped full of air with three insertions by Hori. They don’t inflate much, but they’d be affected enough to be launched, as Taizo would then release them from his pump and send them flying in a random direction. Because of the sudden release of air, they’d be launched quickly, and rather far. The lighter the character, the more susceptible they’d be to being KO’d entirely. After completing this task once, Taizo leaves. | |
|
Hakkun Sutte Hakkun |
Hakkun would nuzzle up to an opponent, and do one of two things, if he manages to get close enough. He may absorb an enemy’s whole body, taking on their shape and appearing as a glass-like replica of that character’s model. He’d then control the character for a few seconds, surely irritating the player. Alternatively, Hakkun would sometimes absorb all of the colour from another character’s model, causing them to appear colourless, as he usually is. Like in his own game, lack of colour results in a direct halt of motion. The colourless character will sit where they were when absorbed, statue-like. For about 8 seconds, they’d be able to be attacked for easily-dealt damage, but would not suffer knockback. After a set amount of time, Hakkun would either expel the character (if they were absorbed), or return the colour to their model. | |
|
Wave Racers Wave Race |
The Wave Racers, four in total, come crashing into the stage on their high speed wave racers. They come landing on one side of the screen and continue the other side; falling down if there is a drop off the stage. It does 5% damage per hit from a Wave Racer. | |
|
Rainman Hanafuda |
Anyone above Rainman is frozen in place. Clouds part, and a stylized sun bursts out from behind them. As the screen brightens, stylized rays of light shine upon Rainman, and calligraphic flowers bloom at his feet. From these flowers rises a red phoenix, which boosts straight upward. Always a KO for anyone the attack was initiated on. | |
|
Tails Sonic |
Tails would quickly fly in from one side of the screen, dropping an air-raid of bombs below him as he cruises overhead. The bombs would instantly explode upon hitting the ground or a player. Tails would return from the opposite side of the screen, dropping a second flurry of explosives. While the bombs wouldn’t be powerful enough to KO a player, they’d build up quite a bit of damage if not dodged. Finally, Tails would fly across the screen once more, and send a cluster of homing lasers at the players. The lasers would deal more damage than the bombs, but could be dodged with enough precision. | |
|
Raiden Metal Gear |
Raiden would proceed to hunt down and attack other players, usually focusing on the fighter nearest to him. His attacks would be general slashes with his sword, but he’d get fancy and make use of his heeled feet for kicking slices (being able to attach his sword to his heels). Raiden would be among the more aggressive Assist Trophies, with high enough AI to pursue other players to enough of an extent that he wouldn’t be very easy to dodge. |
Pokémon[]
| Image | Name | Move |
|---|---|---|
| Beedrill | Twineedle | |
| Meowth | Pay Day | |
| Alakazam | Ally Switch | |
| Exeggutor | Barrage | |
| Marowak | Bonemerang | |
| Hitmonlee | Mega Kick | |
| Hitmonchan | Mach Punch | |
| Jynx | Lovely Kiss | |
| Magikarp | Splash | |
| Spinarak | Spider Web | |
| Misdreavus | Pain Split | |
| Scizor | Metal Claw | |
| Heracross | Megahorn | |
| Octillery | Octazooka | |
| Delibird | Present | |
| Skarmory | Steel Wing | |
| Hitmontop | Triple Kick | |
| Lugia | Aeroblast | |
| Ho-oh | Sacred Fire | |
| Cacnea | Needle Arm | |
| Zangoose | Crush Claw | |
| Seviper | Poison Tail | |
| Castform | Weather Ball | |
| Sealeo | Ice Ball | |
| Metagross | Meteor Mash | |
| Latias | Mist Ball | |
| Latios | Luster Purge | |
| Jirachi | Doom Desire | |
| Deoxys | Psycho Boost | |
| Chatot | Chatter | |
| Rhyperior | Rock Wrecker | |
| Dialga | Roar of Time | |
| Palkia | Spacial Rend | |
| Heatran | Magma Storm | |
| Regigigas | Crush Grip | |
| Giratina | Shadow Force | |
| Shaymin | Seed Flare | |
| Arceus | Judgment | |
| Victini | Searing Shot | |
| Tepig | Heat Crash | |
| Oshawott | Razor Shell | |
| Whirlipede | Steamroller | |
| Minccino | Tail Slap | |
| Sawsbuck | Horn Leech | |
| Joltik | Electroweb | |
| Bouffalant | Head Charge | |
| Volcarona | Fiery Dance | |
| Reshiram | Blue Flare | |
| Zekrom | Bolt Strike | |
| Kyurem | Glaciate | |
| Keldeo | Secret Sword | |
| Meloetta | Relic Song | |
| Genesect | Techno Blast | |
| Chesnaught | Spiky Shield | |
| Delphox | Mystical Fire | |
| Litleo | Noble Roar | |
| Pancham | Parting Shot | |
| Noivern | Boomburst | |
| Xerneas | Geomancy | |
| Yveltal | Oblivion Wing | |
| Zygarde | Land's Wrath | |
| Diancie | Diamond Storm |